API is for ‘application programming interface’. Is usually documented methods specifically how to interconnect with the server.
There are public domain API and also private API.
Public domain like Google, Facebook, Twitter etc make the APIs so that others developer can make use of their data to extend the usefulness beyond their own apps. It promotes developer to be more creative, and can mash-up with other APIs to make new kind of applications.
Private API is the one that we make it internally that we don’t share to the world. We just make it to work with only certain our own apps.
REST is easy and robust way to connect to an API. REST is for ‘representational state transfer’. It’s the way to transfer information from client app to server with some ‘states’. States can be like GET, POST, PUT, DELETE etc. We will get the return from server in JSON format.
API need to be documented properly so that the mobile apps developer can be happier to integrate.
So let’s get started to build our own private API that we can use for mobile apps with Laravel.
1. Tools that We Need
There are plenty option out there but, if you are using Mac, here are the list :
• Coda 2 (https://panic.com/coda/) / Atom (https://atom.io/) / Sublime Text 2
• Sequel Pro (https://www.sequelpro.com/)
• MAMP Pro (https://www.mamp.info/en/)
Terminal
• Terminal (build in with macOS)
• For Windows you may use CygWin (https://cygwin.com)
Dependancy Manager
• Composer (https://getcomposer.org/)
2. Create Laravel Project
Open up your Terminal or something like that. Make sure you have download Composer https://getcomposer.org/doc/00-intro.md.
Here is the code to create new Laravel project called ‘myapi’
$ composer create-project laravel/laravel myapi
Then go to the ‘myapi’ folder
$ cd myapi
Check the version of your Laravel. At the time of writing mine is Laravel Framework 5.4.23
$ php artisan --version
Laravel Routing
Routing is define how your app can be access through your routes.
Open the myapi folder with your favorite IDE like Coda, Sublime Text or Atom.
Find ‘routes’ folder. Then open ‘api.php’. Inside the api.php folder is the routes that can be define with api middleware. It can be access with your base URL then ‘/api/’ then the route.
In api.php we will add a new route called ‘/’, with retruning a JSON value.
use Illuminate\Http\Request;

Route::get('/', function () {

  $result = ['result' => 'OK',
             'data' => 'No Data Yet'];

  $response = \Response::json($result)->setStatusCode(200, 'Success');

  return $response;

});
The important part is to make use of $result with proper value. So that we can create a meaningful return message.
Now we want to make our application up and running. To test that our new route ‘/’ to be accessed.
$ php artisan serve
Then you can access the server with this route http://127.0.0.1:8000/api/

Horay! We get our first API call with returning JSON text.
So let’s have a look at the result.
{
  result: "OK",
  data: "No Data Yet"
}
This is a super basic JSON return we can find.
Try With Postman
In the meantime we need also need to with app that specifically tailored for API testing. Compared to Chrome or Safari, Postman give more information about the return of the API call.

For example now we are using the same url (http://127.0.0.1:8000/api/) with GET method. In addition we can see the JSON result, we also can see the status code (in this case is 200) and the status message which is ‘Success’. Also there is time to measure how long it will take for a server returning the value.
Connect to Database
We have already setup our Laravel
Configure ENV for Database
Before we should run the server we may need to configure our database at .env file. Edit these configuration suit your MySQL configuration.
This is the example of my settings for .env file.
DB_CONNECTION=mysql
DB_HOST=127.0.0.1
DB_PORT=8889
DB_DATABASE=myapi
DB_USERNAME=root
DB_PASSWORD=root
Then you need to open and run MAMP/XAMPP to activate the MySQL database engine.

Then open app like Sequel Pro to manage your database.

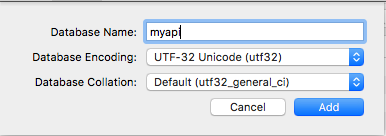
After entered the database, create a new database called ‘myapi’. Database preferred encoding is UTF-32 Unicode (utf32) so that we can support language like Japanese too.
First we want to make a standard user management with auth.
$ php artisan make:auth
Then we need to setup the database for auth.
$ php artisan migrate

You will have tables ‘migrations’ and ‘users’ table on ‘myapi’ database.
It give the easiest way to creating the users through the website.
Do restart Laravel server. On the terminal press control-c, to off ther server, then turn on back with this.
$ php artisan serve
Then go to http://localhost:8000/register and try to register a user.

You will see this when you are successfully created a new user.

Then please check your database to make sure there is new entry on ‘users’ table.
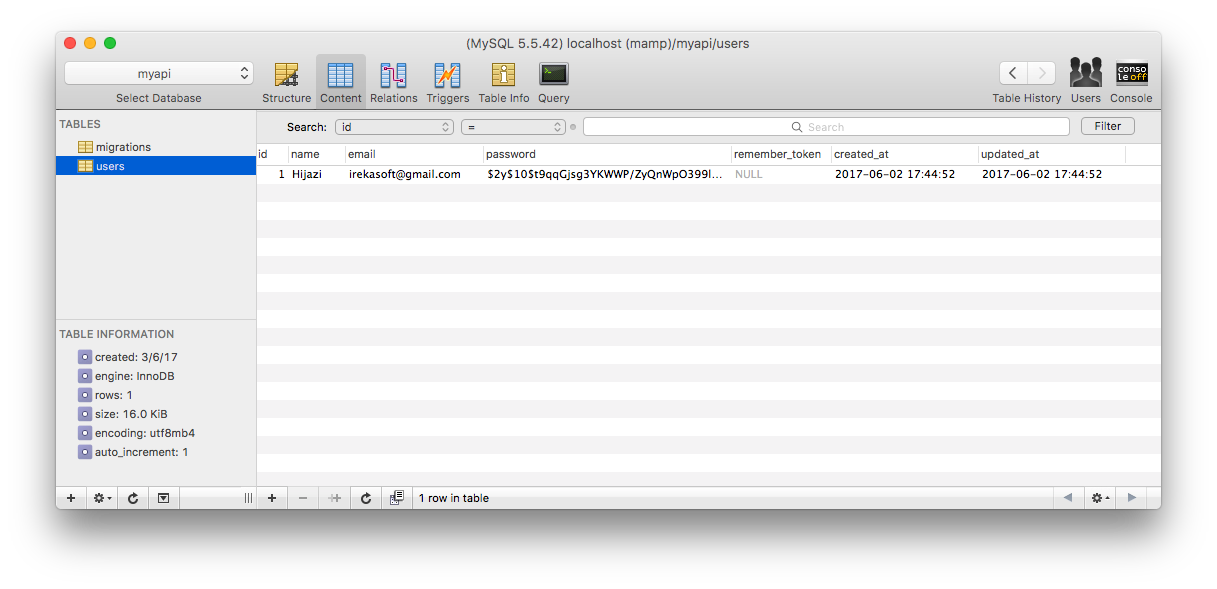
Notice that the password field is hashed properly. This is important to care of user’s password privacy.
Now we can use the email and password to login with API on the next section.
Creating the API for Auth
Now we gotta make the version for API so that we can make mobile app can register and login too.
Sign Up API
Now let’s back to our routes/api.php. Add this route after ‘/’ route name it as ‘signUp’.
Route::post('signUp', function(Request $request){ // [1]

  // [2]
  $name = \Request::get('name');
  $email = \Request::get('email');
  $password = \Request::get('password');

  $password_bcrypt = bcrypt($password);

  // [3]
  $validator = Validator::make(
       [
           'name' => $name,
           'email' => $email,
           'password' => $password
       ],
       [
           'name' => 'required',
           'email' => 'required|email|unique:users',
           'password' => 'required|min:6'
       ]
   );

  // [4]
  if ($validator->fails()){

    $result = ['result' => 'Failed',
               'message' => 'Some of the requirements are not met'];

     $response = \Response::json($result)->setStatusCode(400, 'Fail');

     // [5]
     return $response;

  } else {

    // [6]
    $user = new \App\User;

    $user->name = $name;
    $user->email = $email;
    $user->password = $password_bcrypt;

    $user->save();

    $result = ['result' => 'Success',
               'message' => 'Account '. $name . ' with email '. $email . ' was created'];

     $response = \Response::json($result)->setStatusCode(200, 'Success');
     return $response;

  }

});
[1] On this case we are creating a POST method route which receiving ‘signUp’ route. So your url will be ‘localhost:8000/api/signUp’ route.
[2] Next we will receiving some accepted parameters: name, email, password.
[3] Next we have a validator. We specify which parameters, and what specifications that the value should be.
[4] Then we check whether all of them are valid or not.
[5] If not return JSON with fail message with status code 400.
[6] If nothing bad, create a new user, put the parameters and save it. Return a JSON with status code 200.
Well now you can check the created account with the website by log in it newly created email and password.
Test with Postman with something like this. At the body put all the parameters with the valid values.
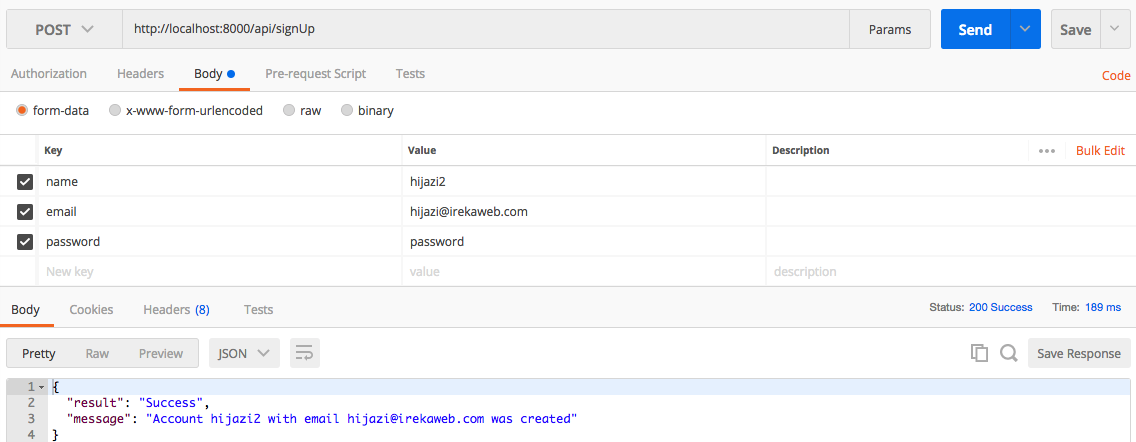
Hit ‘Send’ then you will get this kind of JSON feedback. Check also your database to see whether the data is successfully inputed.
Log In API
Let’s take a look of login API.
Route::post('login', function(Request $request){

  $email = \Request::get('email');
  $password = \Request::get('password');

  // [1]
  $user = \App\User::where('email','=', $email)->first();

  // IF THE THERE IS EMAIL MATCHED
  if ($user != null){

    if (Hash::check($password, $user->password)){

        $result = ['result' => 'Success',
                   'message' => 'Password correct',
                                     'user_id' => $user->id];

        $response = \Response::json($result)->setStatusCode(200, 'Success');
        return $response;

    }else{

      $result = ['result' => 'Failed',
                 'message' => 'Password Incorrect'];

      $response = \Response::json($result)->setStatusCode(400, 'Fail');
      return $response;

    }

  // NOT MATCHED
  }else{

    $result = ['result' => 'Failed',
               'message' => 'User with email not found'];

    $response = \Response::json($result)->setStatusCode(400, 'Fail');
    return $response;

  }

});
Well this route is similar too with Sign Up route.
[1] Try to get the user that have the email.
Then check whether it exist or not. If exist hashed the received ‘password’ and check it’s matched with from the database.
If matched then we return a 200 status code with JSON. It will return a user_id for reference.
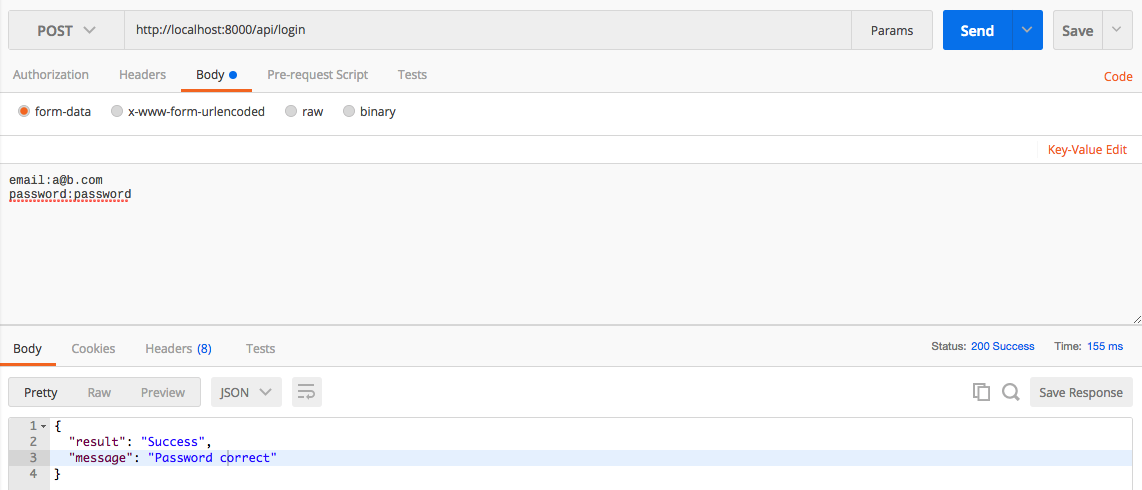
Now let’s try on Postman for login.
Summary
We have learn how to setup environment for Laravel and developed a simple API with Laravel out-of-the box authentication system.
It’s hopefully showed you how to develop from dummy API to functional API that really incorporated with the database.
Next step is to build more model, with some migration to create it’s own database table and ‘CRUD’ them appropriately with API’s route.
Hope you enjoy this little tutorial and don’t forget to leave comment or feedback on this topic.