UICollectionView is view component that support grid view. UICollectionView’s implementation is like UITableView, but UICollectionView can be more than grid, it’s highly cusomizable with it’s layout property. The default layout that we will be using is called the Flow Layout.
On this post we will learn how to put a collection view in to a standard view controller.

Using Collection View
1. Setup Storyboard for Collection View
Create a single view project with support universal app. Open the storyboard, add a collection view in to the main view. Pin it around the superview for heading, top, trailing and bottom for 0pt.
Name the cell’s identifier as “Cell“. Add a UIImageView and UILabel inside the cell.

Also, change the UICollectionView’s background color to light grey, and change the cell’s background color to white.
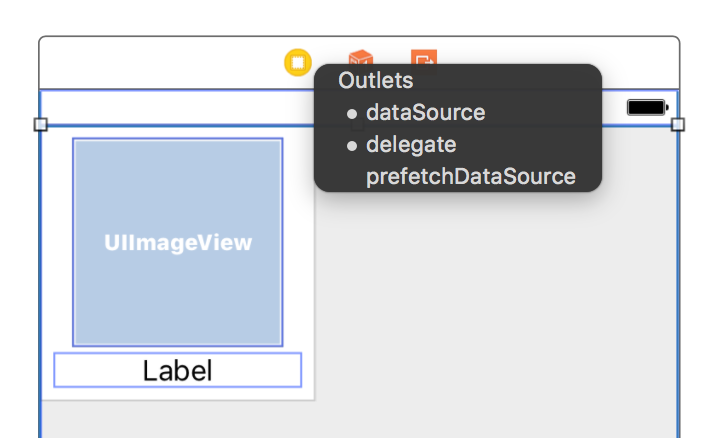
2. Connect for IBOutlet, Delegate and Data Source
Control-drag from added collection view to your code to make IBOutlet, name it as collectionView.
Control-drag again, to the view controller (the yellow circle on left side). Select for dataSource. Do it again now select for delegate.
For delegate and dataSource we have to do something with the code. We have to declare of adapting those delegate and dataSource things which are type of protocols.
Learn more about protocol.
Now add UICollectionViewDataSource and UICollectionViewDelegate protocols at class’s definition.
class ViewController: UIViewController : UICollectionViewDataSource, UICollectionViewDelegate {

  ...
}
3. Implement DataSource’s Functions
By adopting those protocols we also need to implement, at least, the required protocol’s method. And also we want to implement others protocol’s functions as well.
To make the codes a bit more organized we use // MARK: - to separate codes, and also use to note that after this mark we are using functions from some particular protocol. For example of using UICollectionViewDataSource we will write like this:
// MARK:- UICollectionViewDataSource
Besides to organize the code better, it has benefit by having a short cut to the protocol’s definition by clicking command+click on the protocol’s name.
Now we add this implementation functions of UICollectionViewDataSource before the closing bracket of view controller class.
// MARK:- UICollectionViewDataSource

func collectionView(_ collectionView: UICollectionView, numberOfItemsInSection section: Int) -> Int {

  return 5

}

func collectionView(_ collectionView: UICollectionView, cellForItemAt indexPath: IndexPath) -> UICollectionViewCell {

  let cell = collectionView.dequeueReusableCell(withReuseIdentifier: "Cell", for: indexPath)
  return cell

}
For now only UICollectionViewDataSource need to implement the required functions. UICollectionViewDelegate does not have one, so it will not be crashing if we run the app now. If you run the app we will see some cells that is not arranged well, but at least for now it should be appeared. And not crashing.
Anyway, how do we know what is required functions or not? The answer is to look up to the protocols definition. As mentioned before by adding MARK: – with the actual protocol name, we can jump to the definition by command-clik on the name. Please take a look at UICollectionViewDataSource definition. It has mark @required which means we have to implement the functions.
What the functions do:
- numberOfItemsInSection: how many item you want to show
- cellForItemAt indexPath: what kind of cell do you want to show on particular indexPath
4. Implement Delegate’s Functions
Lets add another MARK: – UICollectionViewDelegate.
// MARK:- UICollectionViewDelegate
func collectionView(_ collectionView: UICollectionView, didSelectItemAt indexPath: IndexPath) {
  print("\(indexPath)")
}
Now for this method it will get called when we select a cell at certain index path, and it will print out on the console.
Some note about
IndexPath, it represents withsectionanditemposition. For now, we only deal with one section, so the Index Path will be always havesectionas 0.
5. Adding a UICollectionViewCell
Add new file, select ‘Cocoa Touch’, subclass to UICollectionViewCell, name it as ItemCell.swift.
On the storyboard, select the cell inside the collection view, set the class name as ItemCell.
Now we can connect IBActions for property declaration. Connect property to generate these line of codes:
@IBOutlet weak var imageView: UIImageView!
@IBOutlet weak var label: UILabel!
Back to the main view controller, adjust the function to this:
func collectionView(_ collectionView: UICollectionView, cellForItemAt indexPath: IndexPath) -> UICollectionViewCell {

  let cell = collectionView.dequeueReusableCell(withReuseIdentifier: "Cell", for: indexPath) as! ItemCell
  cell.label.text = "\(indexPath.row.hashValue)"

  return cell

}
We will have something like this:

Adapting to Superview screen size.
To support a whole ecosystem of iOS devices, we have to consider iPad Pro 12.9″, 9.7, iPhone 6 Plus, iPhone 6, iPhone SE and iPhone 4S. And inside iPad there are view for 1/3 or 1/2 screen.
Introducing Size Class, or programmatically named UIUserInterfaceSizeClass which a property of traitCollection of your current view controller. It has some sort of helper, to know what kind of class size you are on, in horizontal or vertical, which we are already printing out.
Simply put the value of Size Class is compact or regular. More on that is here. Or it will print out compact as 1, and regular as 2.
1. Handling Orientation and Size Changes
// MARK:- UIViewController Override

override func viewWillTransition(to size: CGSize, with coordinator: UIViewControllerTransitionCoordinator) {

  super.viewWillTransition(to: size, with: coordinator)

  coordinator.animate(alongsideTransition: { context in
    // do while animation
  }, completion:{
    context in
    // do after animation completed

    print("horizontalSizeClass:\(self.traitCollection.horizontalSizeClass.rawValue)")
    print("verticalSizeClass:\(self.traitCollection.verticalSizeClass.rawValue)")

    print("view.size:\(self.view.frame.size)")

    print("statusBarOrientation: \(UIApplication.shared.statusBarOrientation.rawValue)")
  })

}
Those code is going to be executed when you changing device orientation. By definition right now, by changing the orientation, means changing the size of the window, and also the main view.
If you try to log out while using the app, while changing the orientation by shortcut command → or command ←.
For orientation changes we can specify it with this code:
UIApplication.shared.statusBarOrientation
// or
if (UIApplication.shared.statusBarOrientation.isPortrait){
  // potrait
}else {
  // landscape
}
2. Detecting Device
It’s generalization of thinking about the size, in user interface perspective. We also can generalized screen size by devices:
if (UIDevice.current.userInterfaceIdiom == .pad){
  // iPad
}else if (UIDevice.current.userInterfaceIdiom == .phone){
  // iPhone
}else if (UIDevice.current.userInterfaceIdiom == .tv){
  // can detect tv
}else if (UIDevice.current.userInterfaceIdiom == .carPlay){
  // also car play
}
3. Update View Function
We will create a new function that would be called to update the collection view.
func updateViews(){
  let viewSize = self.view.frame.size

  if (UIApplication.shared.statusBarOrientation.isPortrait){
    // potrait
    let cellLength = (viewSize.width/3.0)-1
    self.cellSize = CGSize(width: cellLength, height: cellLength)
  }else {
    // landscape
    let cellLength = (viewSize.width/5.0)-1
    self.cellSize = CGSize(width: cellLength, height: cellLength)
  }

  self.collectionView.collectionViewLayout.invalidateLayout()
}
We purposely -1 on both length so that the cell is 1 point shorter so that it pull not get pushed to bottom.
We call it at 2 places:
At viewDidLoad()
updateViews()
Inside viewWillTransition function.
...
coordinator.animate(alongsideTransition: { context in
  // do while animation
  self.updateViews()
}, completion:{context in })
...
So whenever it load up, and changing it size it will always call updateViews.
4. Implement FlowLayout Delegate’s Function
The challenge with collection view is properly adapt the cell with the superview environment, and it has to be adaptable with changes of size.
Now add UICollectionViewDelegateFlowLayout protocol declaration after comma. Then we will implement suitable functions.
// MARK:- UICollectionViewDelegateFlowLayout
  func collectionView(_ collectionView: UICollectionView, layout collectionViewLayout: UICollectionViewLayout, sizeForItemAt indexPath: IndexPath) -> CGSize {
    var size = CGSize(width: 40, height: 40)
    return size
  }
It will make the cell sized at 40by40 points. Many information about the size changing is at viewWillTransition: function.
So we need to make a global variable to define what kind of cell size that is suitable for certain view size.
// global variable
var cellSize: CGSize!
// at viewDidLoad
cellSize = CGSize(width: 40, height: 40)
Change size defining function to like this.
// MARK:- UICollectionViewDelegateFlowLayout
func collectionView(_ collectionView: UICollectionView, layout collectionViewLayout: UICollectionViewLayout, sizeForItemAt indexPath: IndexPath) -> CGSize {
  return cellSize
}
5. More FlowLayout Delegate’s Functions
There are still few more functions of FlowLayout’s delegate to make the cells for fit.
- minimumLineSpacingForSectionAtIndex
- minimumInteritemSpacingForSectionAtIndex
- insetForSectionAtIndex
In code, please add these code at the end of view controller class.
func collectionView(_ collectionView: UICollectionView, layout collectionViewLayout: UICollectionViewLayout, minimumLineSpacingForSectionAt section: Int) -> CGFloat {
  return 1
}

func collectionView(_ collectionView: UICollectionView, layout collectionViewLayout: UICollectionViewLayout, minimumInteritemSpacingForSectionAt section: Int) -> CGFloat {
  return 1
}

func collectionView(_ collectionView: UICollectionView, layout collectionViewLayout: UICollectionViewLayout, insetForSectionAt section: Int) -> UIEdgeInsets {
  return UIEdgeInsets.zero
}
