This tutorial is build with Xcode 8 and using Swift 3. Realm 2.0.3. Prerequisite: CocoaPods.
Introduction to Realm
Realm is a great replacement for both SQLite and Core Data, it offers a quick and painless way to persist data in your iOS (and Android) app. It really is a brilliant piece of software, you can checkout the official documentation if you’re in need of a persistence framework for your app.
Realm Quick Tour
Here is how to define a model. You can save this as Item.swift file.
class Item: Object {
    dynamic var detail = ""
    dynamic var status = 0
}
To create new object.
let item = Item()
item.detail = "Design a prototype"
item.status = 0
Then save it.
let realm = try! Realm()
try! realm.write {
  realm.add(item)
}
When you want to query all the items.
let items = realm.objects(Item.self)
or you want to query all the items with filtered status that is 0.
let items = realm.objects(Item.self).filter("status = 0")
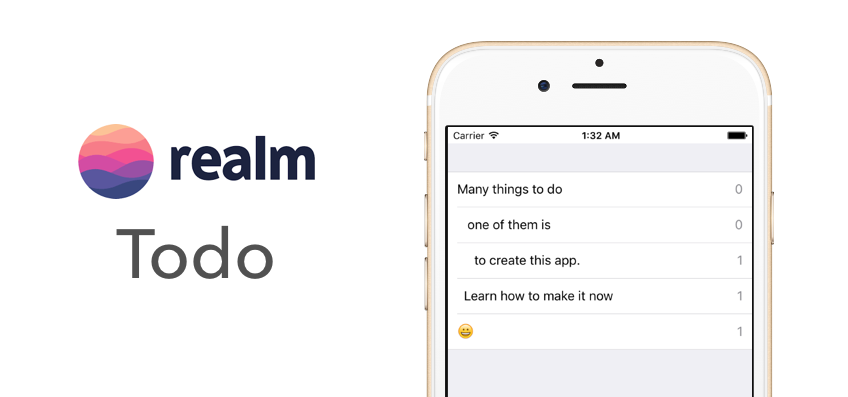
So lets start our journey by making a simple Todo app with Realm.
Making Todo App
1. Create New Project
We’re going to learn simple todo list with Realm. Create a new Xcode project, choose ‘Single View Application‘ and name it as RealmTodo.

2. Install Realm with CocoaPods
You need to have CocoaPods version 1.1.0. See update.
Open Terminal, type ‘cd ‘ then drag you project folder into the terminal. Click enter. Then initiate podfile with this command.
pod init
It will generate a file called Podfile. Edit the Podfile with editor like Xcode.
target 'RealmTodo' do

  use_frameworks!
  pod 'RealmSwift'

end
Save the Podfile and Install the pod with this command.
pod install
After the process completed successfully, then close the current .xcodeproj file,
Open the newly generated .xcworkspace file.
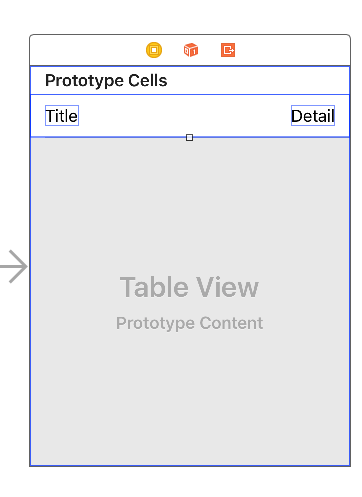
3. Main.storyboard and ViewController.swift
At Main.storyboard, at the main ViewController scene with, add a table view and a button.
We don’t cover how to do the adaptive layout here.

The prototype cell is “Right Detail”. Name the cell identifier as “Cell”.
On the user interface side, add a UITableView, link it to IBOutlet, delegate and dataSource.
Also add a button called ‘Add New’ at the bottom.
Now we have to edit ViewController.swift file to add functionality for UITableView. At first we just want to make sure it works first. Now replace code inside ViewController.swift with this one.
// ViewController.swift
import UIKit

class ViewController: UIViewController, UITableViewDelegate, UITableViewDataSource { // [1]
  @IBOutlet weak var tableView: UITableView!

  // MARK: UITableViewDataSource
  // [2]
  func tableView(_ tableView: UITableView, cellForRowAt indexPath: IndexPath) -> UITableViewCell {
    let cell = tableView.dequeueReusableCell(withIdentifier: "Cell", for: indexPath)
    cell.textLabel!.text = "it works"
    cell.detailTextLabel!.text = "on going"
    return cell
  }

  // [3]
  func numberOfSections(in tableView: UITableView) -> Int {
    return 1
  }

  // [4]
  func tableView(_ tableView: UITableView, numberOfRowsInSection section: Int) -> Int {
    return 1
  }

}
[1] Declaring that we want to subclass UIViewController and also want to implement these protocols UITableViewDelegate and UITableViewDataSource. The seperation between superclass and protocol is just one comma (,).
Basically, what protocol is that we promise that we will use some of the functions that are required and optional for UITableView. Functions in these 3 lines [2],[3],[4] are the ones that declared from UITableViewDataSource that is required.
It’s like a representation of UITableView inside this class.
[2] we have to define what kind of cell that we want to show.
[3] how many sections we want to show for this table view. For this project 1 is just enough, so we return value 1.
[4] how many number of row do you want to show? the answer for now is 1, so we return 1. We will add dynamism on this function.
The result for current code will be like this.

4. Add the Action
Add an IBAction to ViewController class with action named addNew: from UIButton at the bottom and add the code like below.
@IBAction func addNew(sender: AnyObject) {

    let alertController : UIAlertController = UIAlertController(title: "New Todo", message: "What do you plan to do?", preferredStyle: .alert)

    alertController.addTextField { (UITextField) in

    }

    let action_cancel = UIAlertAction.init(title: "Cancel", style: .cancel) { (UIAlertAction) -> Void in

    }
    alertController.addAction(action_cancel)

    let action_add = UIAlertAction.init(title: "Add", style: .default) { (UIAlertAction) -> Void in

    }
    alertController.addAction(action_add)

    present(alertController, animated: true, completion: nil)

}
We used UIAlertController with Alert style. Then we added serveral components like textField and 2 actions (cancel and add).
Take note that we have a closure inside action_add where we will handle the data input when user tap on “Add” button.

5. Now We Ready to Add Realm
Well that’s why we are using Realm, it’s pretty easy to add on. But first we need to define our model. We called it as TodoItem. Each item has detail the description of what to do and status to indicate is has done (1) or not (0).
// TodoItem.swift
import RealmSwift
class TodoItem: Object {
  dynamic var detail = ""
  dynamic var status = 0
}
Back to ViewController.swift add import RealmSwift after UIKit.
import RealmSwift
Add this code after tableView declaration.
// ViewController.swift
let realm = try! Realm() // [1]
var todoList: Results<TodoItem> { // [2]
    get {
        return realm.objects(TodoItem.self)
    }
}
[1] First we will declare the realm object so we can use it throughout the class.
[2] This is the result that we will get from the database.
6. Adding Data to Database
Now we have to prepare how to we add data to our Realm database. On this project we just use UIAlertController with UITextField to help us to input the data. What we need is to alter the code at addNew: function.
// ViewController.swift

. . .
alertController.addAction(action_cancel)

let action_add = UIAlertAction.init(title: "Add", style: .default) { (UIAlertAction) -> Void in

    let textField_todo = (alertController.textFields?.first)! as UITextField
  print("You entered \(textField_todo.text)")

}
This will just print out something as we click “Add”. Check it first before we add the real database.
Add this code after print(...) statement.
// ViewController.swift
. . .
let todoItem = TodoItem() // [1]
todoItem.detail = textField_todo.text!
todoItem.status = 0

try! self.realm.write({ // [2]
    self.realm.add(todoItem)
    self.tableView.insertRows(at: [IndexPath.init(row: self.todoList.count-1, section: 0)], with: .automatic)
})

. . .
[1] What we did here is to instanstiate a new todoItem and set the detail and status.
[2] Then, we save into Realm persistent.
Before we test out, we also need to change the content of the cell. Go to tableView(tableView: cellForRowAt indexPath:) function. We have to alter how do we get data to display.
Replace with this code.
// ViewController.swift
func tableView(_ tableView: UITableView, cellForRowAt indexPath: IndexPath) -> UITableViewCell {
    let cell = tableView.dequeueReusableCell(withIdentifier: "Cell", for: indexPath)

    let item = todoList[indexPath.row]

    cell.textLabel!.text = item.detail
    cell.detailTextLabel!.text = "\(item.status)"

    return cell
  }

func tableView(_ tableView: UITableView, numberOfRowsInSection section: Int) -> Int {
    return todoList.count
}
7. Mark As Done
To mark as done we just have to tap on the desired cell and the status will change from 0 to 1 and vice versa.
To implement that we need to use a function that declared in UITableViewDelegate. Add this code after UITableViewDataSource functions.
// ViewController.swift
// MARK: UITableViewDelegate
func tableView(_ tableView: UITableView, didSelectRowAt indexPath: IndexPath) {
    let item = todoList[indexPath.row]
    try! self.realm.write({
        if (item.status == 0){
            item.status = 1
        }else{
            item.status = 0
        }
    })
    tableView.reloadRows(at: [indexPath], with: .automatic)
}
What this does is, it will set the status as 1 if current status is currently 0, and otherwise, we set it back to 0.
The data is all persistent. Try to restart the app, and you will find out if it’s true or not.
8. Swipe to Delete Item
Right after the didSelectRowAtIndexPath function add this code:
// ViewController.swift
// [1]
func tableView(_ tableView: UITableView, canEditRowAt indexPath: IndexPath) -> Bool {
    return true
}

// [2]
func tableView(_ tableView: UITableView, commit editingStyle: UITableViewCellEditingStyle, forRowAt indexPath: IndexPath) {

    if (editingStyle == .delete){
        let item = todoList[indexPath.row]
        try! self.realm.write({
            self.realm.delete(item)
        })

        tableView.deleteRows(at:[indexPath], with: .automatic)

    }

}
[1] Table View want to know that you want to edit the table view with technique such swipe to delete, you say return true.
[2] On the swiping we will respond to editing style called .delete and we ask Realm to delete the item based on the indexPath and lastly we update the table view by delete the specific row.
What we have done
So far we have learn how to integrate Realm, adding object, show, edit, and delete the to do item. It’s basically CRUD (create, read, update, delete) for iOS app.
Make Realm in App Groups
Now, we want to make the database accessible by Today Widget or Apple Watch. The way we want to store the database is via the App Groups. Open the project target, open capability and enable app groups. If you create a target for Today Widget or Apple Watch, you may need to enable for App Groups them too.

Remember app group name has to be exact, because we will call the group name in the code. To be simplistic, we use our app bundle id with prefix “group.”, so for this example we will have “group.com.irekasoft.RealmTodo”.
Today Widget
We already talk about iOS Today Widget on this post for reference on how to create a new target.
Create a new Today Widget named ‘Today Extension‘.
Don’t forget to enable App Groups at capability settings for Today Widget target. Add name for this case is also “group.com.irekasoft.RealmTodo”.
Let’s Create Shared File
Let’s create a Swift file that can be accessed by multi-targets. Create a new Swift file, when you save it make sure you ticks on both targets.
If you forget to ticks on those target, you always can do that on File Inspector by selecting the file.

// SharedFile.swift
import Foundation
public let K_GROUP_ID = "group.com.irekasoft.RealmTodo"
public let K_DB_NAME = "db.realm"
Another thing to make ‘Shared File’ is the Realm’s model: TodoItem.swift. Select the file and make it link to ‘Today Extension’ target as well.
Migrate at the Main Target
Now go back to ViewController.swift we have to make some adjustment to how we call Realm.
// Change the Realm definition to this
var realm : Realm!

// At viewDidLoad function
override func viewDidLoad() {

  super.viewDidLoad()

  let directory: URL = FileManager.default.containerURL(forSecurityApplicationGroupIdentifier: K_GROUP_ID)!

  let fileURL = directory.appendingPathComponent(K_DB_NAME)
  realm = try! Realm(fileURL: fileURL)

  // Extras if you wonder where your files is saved
  print("file url \(realm.configuration.fileURL)")

}
By migrating the database to a new place inside the App Groups, we will refert to new database. As result, after run the app we will not see any old database if we created before.
Make sure to migrate first before shipping the product
Updating Pod
Open back our Podfile, and make some adjustment like this.
target 'RealmTodo' do
  # Comment the next line if you're not using Swift and don't want to use dynamic frameworks
  use_frameworks!
  pod 'RealmSwift'

end

target 'Today Extension' do
  # Comment the next line if you're not using Swift and don't want to use dynamic frameworks
  use_frameworks!
  pod 'RealmSwift'

end
Now update the pod.
pod update
TodayWidget’s View Controller
Open ‘TodayViewController.swift’, add this library at the import portion. If it’s showing error, probably you haven’t updating the CocoaPods properly yet.
import RealmSwift

// Inside the class
var realm : Realm!
var todoList: Results<TodoItem> {
  get {
    return realm.objects(TodoItem.self)
  }
}

override func viewDidLoad() {
  super.viewDidLoad()
  let directory: URL = FileManager.default.containerURL(forSecurityApplicationGroupIdentifier: K_GROUP_ID)!

  let fileURL = directory.appendingPathComponent(K_DB_NAME)
  realm = try! Realm(fileURL: fileURL)
}
At MainInterface.storyboard, we will add the table view inside the Today’s Widget UI. We use a prototype ‘Right Detail’ cell with identifier “Cell”.
// Add this to the protocol conformation
UITableViewDataSource

// MARK: - UITableViewDataSource
func tableView(_ tableView: UITableView, numberOfRowsInSection section: Int) -> Int {
  return todoList.count
}

func tableView(_ tableView: UITableView, cellForRowAt indexPath: IndexPath) -> UITableViewCell {

  let cell = tableView.dequeueReusableCell(withIdentifier: "Cell", for: indexPath)

  let item = todoList[indexPath.row]

  cell.textLabel!.text = item.detail
  cell.detailTextLabel!.text = "\(item.status)"

  return cell

}
When you update your database on the app, it will automatically being shown on the today widget too.

Source Code:
Github
Reference:
Realm Swift Latest Docs
Support Us:
Buy App Icon Resizer